
Quick Summary
To document injuries after an accident, get prompt medical evaluation and keep every record, photograph visible injuries on a consistent schedule, and start a daily journal of symptoms and limits. Write a factual description of each injury and preserve digital evidence such as texts, photos, and dashcam video.
- Get a medical evaluation soon after the accident, even if you feel only sore.
- Take photos of visible injuries with consistent lighting, a scale reference, and timestamps.
- Keep a daily journal recording pain on a 0 to 10 scale and activities you could not do.
- Save digital evidence in at least three locations and never edit the original files.
- Avoid posting accident details on social media, since insurers can use those posts against you.
Why Documenting Injuries Right After an Accident Matters
Last Updated: November 12, 2026
Many people leave the scene of a car, truck, or motorcycle accident feeling fine, only to wake up the next morning in pain. How you document injuries in those first hours and days can decide whether your claim holds up later, since careful document injuries work is what insurers and courts look at first. This guide from 305-800-PAIN walks through a practical way to record what happened to your body, from the first doctor visit to the weeks of recovery that follow. (Source: National Center for Health Statistics)
Injuries are often the core of a personal injury claim. For a fuller, step-by-step method for writing injury documentation suited to a legal claim, read How to Document Injuries for a Lawsuit: Step-by-Step. Proper medicolegal documentation is essential to prove the causal relationship between an accident and an injury, as accident reconstruction research makes clear (The Documentation of Injuries Caused by Traffic Accidents). In other words, you need a clear record that links the crash to your pain.
Waiting makes that link harder to prove. Bruises fade, swelling goes down, and memories blur. Good records made early are much easier to defend than records pieced together months later.
Here is what strong early documentation usually includes:
- A prompt medical evaluation, even if you feel only sore
- Photos of visible injuries, taken soon and updated over time
- A daily journal of symptoms and limits on your daily life
- A clear, factual written description of each injury
- Saved digital evidence, such as texts, photos, and dashcam video
Each of these pieces supports the others. Together, they tell a consistent story.
Step 1: Get Prompt Medical Evaluation and Keep Every Record
Seeing a doctor soon after an accident is the first and most important step. Medical records create an official, time-stamped account of your condition. They also show that your injuries started at the time of the crash.
Some injuries, like whiplash and concussions, may not show symptoms right away. Waiting too long can give insurers a reason to argue that something else caused your pain.
Keep every record that comes from your care. That includes:
- Emergency room and urgent care notes
- Physician notes and diagnostic imaging, such as X-rays, MRI, or CT scan results
- Your written treatment plan and prescriptions
- Physical therapy and follow-up appointment notes
- Itemized bills and receipts for treatment
Ask for copies of your records as you go. Store them in one folder, paper or digital. Be sure to tell every provider exactly how the accident happened and where you hurt.
Step 2: Take Photos of Visible Injuries and Update Them Over Time
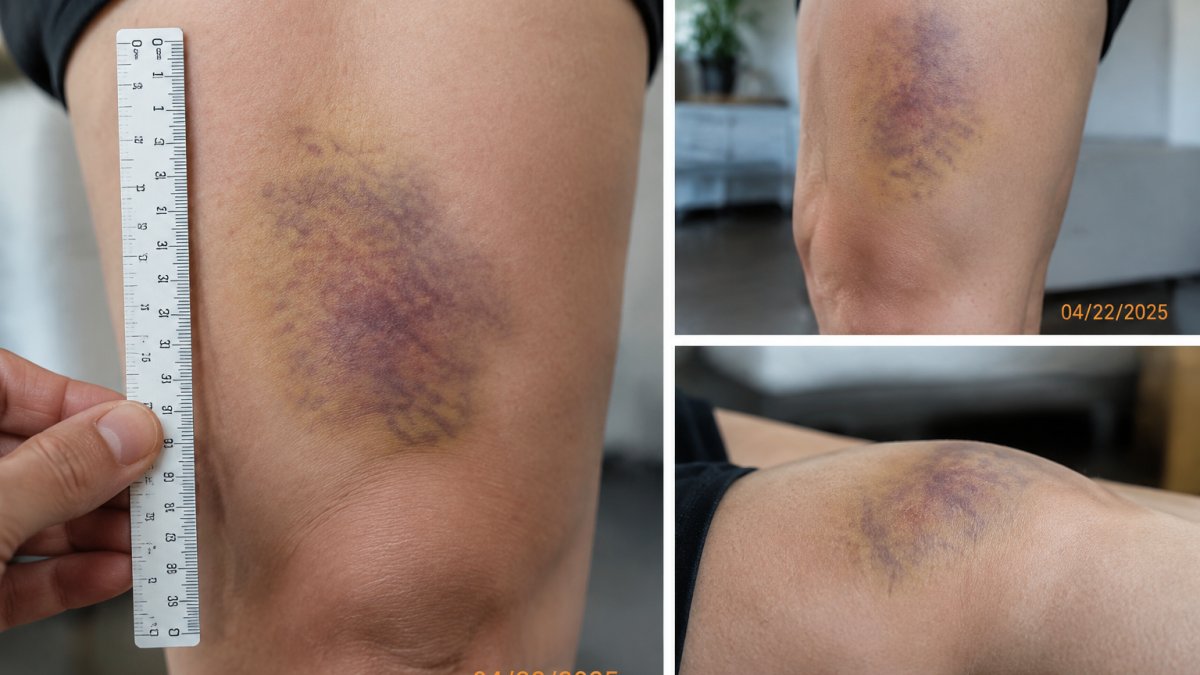
Photos show the injury as it looked at the time and capture how it changed over days and weeks. A bruise can shift from red to purple to yellow, and swelling can spread. But a photo only helps if it is consistent, dated, and unedited.
Build a simple photo protocol. Use the same setup each time so images can be compared side by side:
- Lighting: Use soft, even light. Stand near a window during the day or use a room lamp, and avoid direct flash that washes out color and texture. Take one photo with the flash off and one with it on if you are unsure.
- Background: Use a plain, solid background, such as a white sheet or a bare wall. Remove clutter so the injury is the only subject.
- Scale reference: Place a common object next to the injury for scale, such as a ruler, a coin, or a measuring tape. Keep the same object in every set so sizes can be compared over time.
- Angles: Take at least three images per injury: straight on, from the side, and from above. Add a close-up and a wider shot that shows the body part in context.
- Timestamps: Turn on the date and time stamp in your phone camera settings, or photograph a piece of paper with the date and time written on it in the first frame of each set.
- File naming: Rename copies using a consistent pattern, such as
2026-11-12_left-forearm_bruise_01.jpg, so files sort chronologically and are easy to match to journal entries.
Set a cadence. Take a new set every day for the first week, then every two to three days until the injury heals. For slow-healing injuries, a weekly set is enough. Photograph the injury at roughly the same time of day so lighting and swelling are comparable.
Keep originals untouched. Do not edit, crop, filter, or apply beauty modes to the original files. If you need a cropped version for a doctor or attorney, save it as a separate copy and keep the original intact. Preserve the metadata by transferring files rather than screenshotting them.
Pair photos with notes. In your journal, record the date, time, and file names for each set. A short line like “11/12, 9 a.m., left forearm bruise, set 01-05” lets you match an image to a symptom entry later.
Watch out: Do not delete photos that look unflattering or that you think help the other side. Deleted images can raise questions about whether you were hiding something, and insurers may ask for the full camera roll.
Step 3: Start an Injury Journal to Track Symptoms and Recovery
A daily injury journal records how you feel and what you can no longer do. Medical records show what a doctor saw in a visit. A journal shows what your life looks like between visits.
Write in your journal every day, even if the entry is short. Include:
- The date and time
- Your pain level on a scale from 0 to 10
- Symptoms, such as stiffness, headaches, numbness, or sleep trouble
- Activities you could not do, like lifting groceries or driving
- Missed work and the hours you lost
- Medications you took and any side effects (Source: American Bar Association guidelines)
Use the same format each day so entries are easy to compare. A simple table or notebook works well.
Step 4: Write a Clear, Factual Description of Each Injury
A written injury description puts the details in one place. Use plain language and stick to facts you can see or feel. Avoid guessing about the cause.
For each injury, write down:
- Type of injury, such as a sprain, fracture, or laceration
- Location on the body, using left or right and exact spots
- Severity, including size, color, and how it limits you
- Date you first noticed it
- Treatment you have received so far
For example, write “Bruise on left forearm, about 4 inches long, dark purple, sore when touched” instead of “my arm is badly hurt.” The first version is specific and easy to check against photos.
Compare your written description with your medical records. If they do not match, tell your doctor so the chart can be corrected.
Step 5: Preserve Digital Evidence, Protect Your Privacy, and Handle Delayed Symptoms
Digital evidence can disappear quickly. Phones get lost, cloud storage fills up, and apps delete old messages.
Preserve originals before you share or move anything. Copy files off the phone to a computer or external drive before deleting anything from the device. Do not edit, crop, or overwrite the originals.
Use a three-location backup. Store one copy on the device, one in a cloud service, and one on an external drive kept in a separate place.
Capture messages and call logs. Save texts, emails, and voicemails from the other driver, witnesses, and insurers.
Secure dashcam and phone video. Copy dashcam footage to a computer before the device overwrites it, since many systems loop over old clips. Note the date, time, and camera angle for each clip.
Get the police report. Request a copy of the police or incident report when it becomes available and store it with your other records. Note the report number and the responding agency.
Protect your privacy. Share medical records and photos only with people who need them, such as your doctor, your attorney, or your insurer.
Use a symptom diary template. A ready-to-use daily log makes delayed symptoms easier to prove. Copy this format into a notebook or spreadsheet and fill it in each day:
|
Date |
Time |
Pain (0-10) |
Symptoms |
Mobility and sleep |
Medications and side effects |
Missed work (hours) |
Activities I could not do |
|---|---|---|---|---|---|---|---|
|
11/12 |
9 a.m. |
6 |
Neck stiffness, headache |
Could not turn head fully; slept 4 hours |
Ibuprofen 400 mg, no side effects |
8 |
Driving, lifting groceries |
Keep entries short but specific. Use the same scale and categories each day so patterns are easy to see.
Handle delayed symptoms carefully. Some injuries appear or worsen days or weeks later.
Watch out: Do not stage, reenact, or edit images or notes to make an injury look worse. Factual, contemporaneous records are more credible than dramatic ones, and staged evidence can undermine an otherwise strong claim.
Your Next Step: Speak With a Florida Attorney Before Talking to an Insurer
Insurance adjusters often ask for recorded statements early on. If an insurer has already contacted you, see our guide to handling insurance adjusters in Florida before saying anything on record. Those statements can be used later to challenge your injury claim, so be careful about what you say and when you say it. Many people benefit from speaking with a lawyer before giving any recorded statement.
305-800-PAIN connects injury victims in Florida with experienced personal injury attorneys. Learn when to contact a lawyer for personal injury to protect your rights and your claim’s timing. Our team offers 24/7 support to help you find the right lawyer for your accident. Call now to start protecting your claim.
Frequently Asked Questions
How do I document injuries after an accident?
Start by getting a medical evaluation, even if injuries seem minor, because some symptoms appear hours or days later. Photograph visible injuries on the day of the accident and again at regular intervals as they change. Keep every medical record, bill, and prescription receipt, and start a symptom journal that records pain, location, severity, and daily limitations. Write down what happened while the details are fresh, and store copies of everything in more than one place.
What photos should I take to document an accident injury?
Take clear, well-lit photos of each visible injury, such as bruises, cuts, swelling, or burns, with a common object like a coin or ruler included for scale. Capture the injury from several angles, and retake the photos every few days so the healing or worsening is visible. Keep the original files with their date stamps intact, and avoid editing them. Also photograph the accident scene, vehicle damage, road conditions, and traffic signs if you are able to do so safely.
What should I include in an injury journal after an accident?
Record the date, your pain level on a scale of 0 to 10, the location and type of each symptom, and any medication taken. Note activities you could not do, missed work, and help you needed at home. Describe any new symptoms as they appear, even if they seem unrelated. Keep the journal consistent every day, and bring it to your medical appointments so your doctor can review it.
How soon should I seek medical care after an accident?
See a doctor or go to an emergency room as soon as possible after an accident, ideally the same day. Some injuries, such as concussions, soft tissue damage, and internal bleeding, may not show obvious symptoms right away. Prompt evaluation creates a medical record linking your symptoms to the accident and gives your doctor a baseline for treatment. Report every symptom you notice, and follow the treatment plan you are given.
